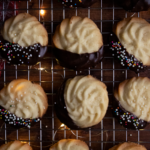
Vegan Butter Cookies
Equipment
- headstand mixer / electric hand mixer
- piping bag or large freezer bag
- piping nozzle of choice
- kitchen scale (optional but recommended)
- parchment paper or silicone mats
- Mixing bowl
- Spatula
- large baking cookie tray
- measuring cups & spoons
- wire / cooling cookie rack
Ingredients
- 1½ block (172g / 12 tbsp) vegan butter (Earth Balance) softed room temperature
- ½ cup (56g) powdered sugar sifted
- 1 cup (150g) unbleached all purpose flour sifted
- 2 tbsp (18g) corn starch sifted
- 1 tsp pure vanilla extract
- 1 tsp almond extract (or substitute for an extra tsp of vanilla)
- 2 tbsp unsweetened plain plant milk (I used soy)
- ¼ tsp salt
FOR THE CHOCOLATE
- 1 bar (113g) German's Sweet Chocolate (I used Baker's 48% cacao)
- sprinkles for decoration
Instructions
- Thaw out butter from the fridge to room temperature for 20-30 minutes (depending on the warmth of your kitchen) to soften. Do not let it melt.
- In a mixing bowl, sift dry ingredients such as the flour, salt, and corn starch. Set aside.
- Using a headstand mixer (or electric hand mixer), add softened butter to the mixing bowl and set speed on medium high. Allow the mixer to beat the butter until it starts to become "light" and airy.Add the vanilla & almond extract along with the milk. Then sift powdered sugar into the butter. Turn the mixer back on and allow it to beat until it reaches soft peaks (or when the butter has looked airy).
- Gradually add dry ingredients into the butter mixture and beat with mixer until well combined. The cookie dough should not be runny or dry either. It should be airy and resemble the consistency of a firm butter cream frosting.
- Line parchment paper or silicone mat on baking tray.
- Assemble your piping bag. Using a scissor, cut the tip of the bag enough to fit the nozzle. Insert the nozzle inside the bag and through the opening of where the cut is. The nozzle tip should be sticking out of the piping bag and secured.
- Using a spatula, scoop your cookie dough into the piping bag. Secure the piping bag tight so that no excess cookie dough will leak through.
- Prepare to pipe on the baking tray. Pipe a 1" - 1½" in diameter cookie dough. Repeat the process on each cookie dough, trying to mimic the same shape and texture as you've created. This may take a few practices to get the hang of it, try your best and have fun! Don't have piping tools? Use a small cookie scoop! Chill your dough for at least thirty minutes in the fridge so you can easily scoop it. It may not have the texture that the nozzle will give but it will still taste great. You can also run the back of your fork across to create a streaky pattern.
- Store piped cookie dough tray into the freezer to allow the butter to chill. Preheat your oven to 350°F for 20 minutes.
- Remove the cookies out of the freezer and bake in the oven for 15-20 minutes or when the edges have turned golden brown. Cookies should run a little thin & crisp but not flat.
- Allow the cookies to cool down.
FOR THE CHOCOLATE
- Break chocolate bar apart into rough pieces so that it is easier to melt. Using a heat resistant microwave safe bowl, place chocolate pieces into it and microwave to gradually melt 1-2 minutes at a time. Remove from the microwave each round stir / whisk evenly. It will start to melt slowly each round. Repeat process until it melts completely and velvet smooth. Do not try to melt all the chocolate at once, as it may burn easily.
ASSEMBLY
- Dip each cookie halfway through the chocolate. Place on a cooling rack. Top with sprinkles for decorations. Allow chocolate to set at room temperature before enjoying! You can also place it in the fridge to let the chocolate set for 30 minutes and then bring it back out to serve.
- Enjoy! Store in a cool area or in the fridge. It will keep for at least five days in an air tight container.
Notes
- Read the entire recipe before getting started to avoid any mistakes. As easy these cookies are, baking still requires following directions. You want to make sure your cookies don't turn out flat or have the incorrect consistency.
- Get a kitchen scale to accurately measure ingredients or be sure to properly measure your flour. Adding too much flour will make your cookies drier and firmer, adding less flour than what the recipe called for will give you a very flat cookie. One of my favorite sources, Sally's Baking Addiction, has a great list of Top Tips on how to measure ingredients properly.
- Work with room temperature butter. Thaw out butter for at least 20-30 minutes depending on how cold or warm your kitchen is. Remember, that vegan butter soften quickly. So be sure to check up on it. Different consistency of butter will affect the result of your cookies. Be sure that the butter is soft to the touch but it is not melting.
- You will need a piping bag and nozzle to create the cute textures of the cookies. Any form of nozzle will do - I like to use star shaped nozzles as they come out really pretty. If you are unable to find the piping bag or nozzle, just chill your cookie dough after whipping for thirty (30) minutes and use a cooking scooper to shape the dough.
- Use Baker's Chocolate Bars to melt! I used the German's Sweet Chocolate 48% Cacao. It sets better on the cookies. I prefer using 48% cacao or semi-sweet chocolate, dark chocolate is very acidic and will have a slight sour after taste.